Links to more detailed videos can be found at the end of the page
INSTRUCTIONS FOR TEACHERS TO CONDUCT ONLINE TESTS
HOW TO LOGIN:
Login to lovemytest.com as a school on institute with the teacher login ID provided to you.
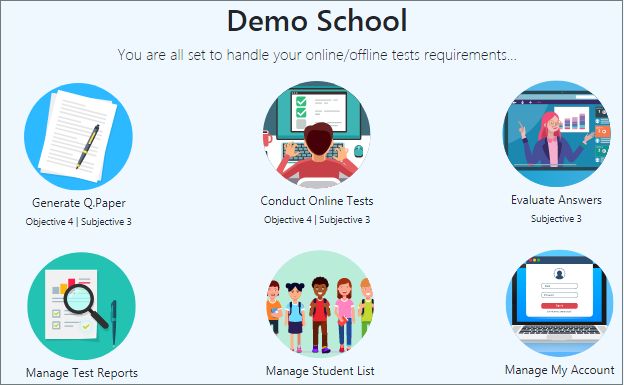
The landing page will have the options to generate question papers, conduct online tests, evaluate answers, manage test reports, manage student list and manage account.
Try to use a computer or laptop for generating question papers as some of the screens would be too big to see on a mobile screen.
TEST CONDUCTION STEPS:
1. Create a Test Code
2. Auto generate a question paper using a blueprint. (If using own questions, need to add the questions before generating the test paper.)
3. Assign Test to Students.
4. Students take the test at the assigned time and teachers can monitor them.
5. Evaluate subjective test answer sheets (Objective tests are auto evaluated).
6. View and download the report.
7. Publish the results to students if required.
8. Students can view the results live when published.
Please go through each of the steps in detail below.
GENERATING QUESTION PAPER :
Teachers' home page has six simple menu items, to create a question paper, conduct exam, evaluate answers, view reports, manage students and manage profile.
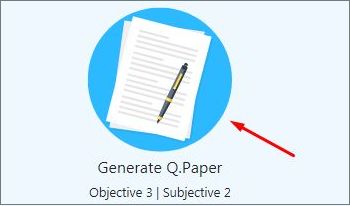
On the homepage click on the 'Generate Q.Paper' option.
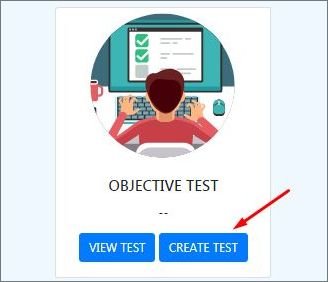
Under 'Objective Test' click on the 'Create Test' option to create a test. Similarly, you can create subjective tests also if it the options activated for you.
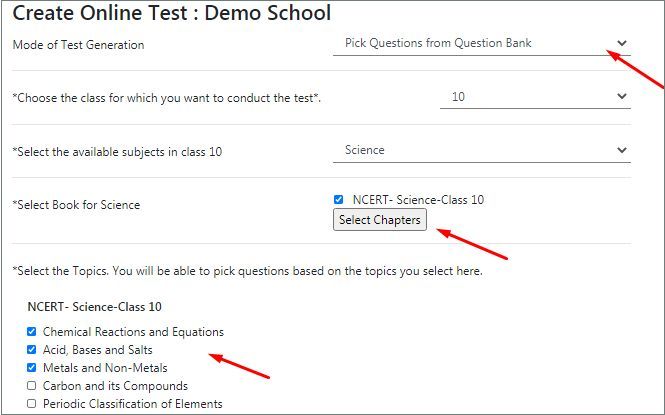
Create a Test_ID by picking questions from the question bank, selecting your assigned classes, subjects, and selecting the chapters and filling the other necessary information.
For new books added by schools, where content is not available, teachers should add chapters before creating test codes. Chapter information is required to create the test codes as you need to mention from which chapters the questions are to be taken.
Keep proctoring as 'Enabled' to allow camera functionality for studnets where camera is active. Students without camera also will be able to take test in this case. If you keep 'Proctoring Mandatory', only those students with camera will be able to take the test.
Click 'Generate question paper' option to start the question paper generation process
Fill the details of number of question needed for each question type. Only MCQs and T&Fs are active for objective tests. Other types will be active for subjective tests. The numbers you give in 'Questions Required' will get allocated automatically in your chosen chapters. You can change the numbers if required in the chapters manually. Data gets added to the test info after every change, hence give few second for it to reflect. You need to ensure the 'Actual marks' of the questions selected by you should match with the 'marks' you defined while creating the test code. You can see the details on the right side. Once your blueprint is set, click 'Auto Generate' to generate the question paper. You can also generate a question paper manually, in which case you will need to select the questions manually in the next step.
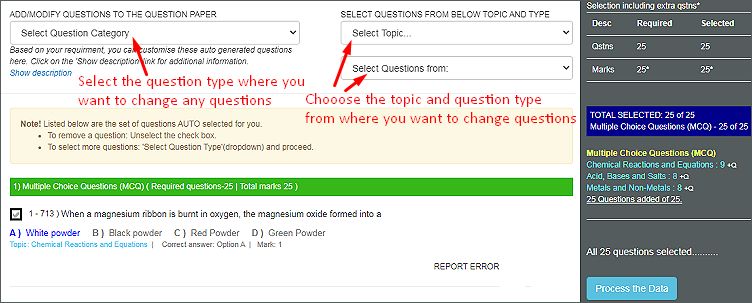
On the question selection page shown below, all the questions automatically picked will be displayed. You can see the status of questions automatically selected from the right side panel.
For changing any questions, select the question type which you need to modify from the 'Add/modify questions' option and choose the chapter and type of questions in the chapter that you want to change from the 'Select Questions' options. All the questions in the selected type will be displayed. The question that is already selected will be shown ticked. You can untick a question to unselect it and tick another question to select it. The changes that you do will get automatically reflected on the right side panel.
For adding your own questions, select the question type which you need to modify from the 'Add/modify questions' option and choose the chapter and type of questions in the chapter where you want to add questions from the 'Select Questions' options. Scroll down to the bottom of the page. An 'Add Questions' option will be displayed to you. Using this link you can add questions. The instructions for adding questions, equations and images are given on the 'add questions' interface.
When the question selection process is complete, with the number of questions required matching with the number of selected questions, the 'Process the Data' option will be active. If you are just seeing 'Save' option, please check that the required number of questions are selected as needed.
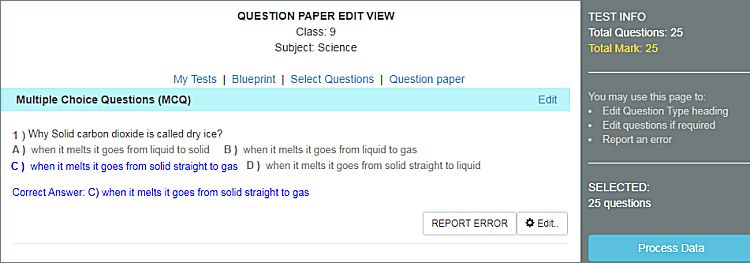
Teachers can edit the selected questions if required and save it for their question paper.
After making and edits click 'Generate Test' on the 'Edit View' page to generate and upload the question paper. If you make any changes to the question paper, please ensure to click 'Generate Test' again on the 'Edit View' page without which the question paper will not get uploaded for online tests. Do not make any changes in the question paper after a test has started. Students will not see any changes unless they logout and login again.
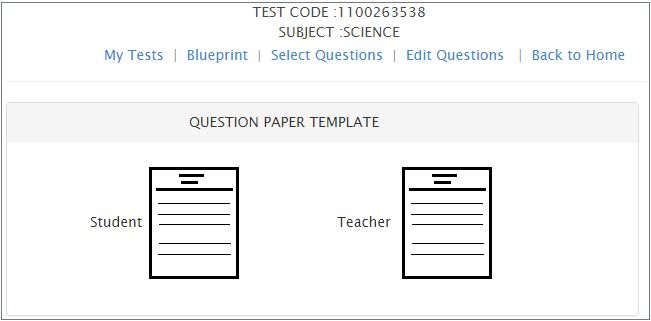
Two versions of the question paper is generated one for students and one for teachers. Teacher's version will be with answers. You can generate a pdf or take print outs of the question papers if required. You can also navigate back to the Blueprint, Select or Edit pages to modify the question paper.
In a similar way teachers can generate subjective question papers too by creating a subjective test.
CONDUCTING ONLINE EXAMS:
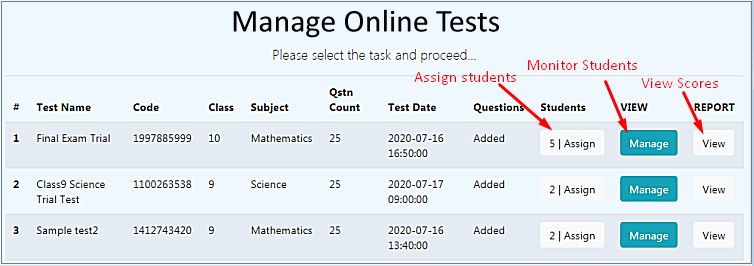
On the homepage click on the 'Conduct Online Tests' option.
Here teachers can assign the tests to students, monitor the students and view the score cards.
Teachers need to assign the students from the 'Assign' link, for the students to take test.
Before you assign tests to students, please ensure that the date and time are set correctly for the test. Else, when the students login, they may be able to get into the test at the time specified.
When the student login, if the test date and time has already crossed, the test will get automatically expired for the student and the student will not be able to start the test again, in which case teacher will have to restart the test for the student as explained in the next step.
Students can now take the test at the scheduled time as explained in the Student Instructions. They should login 5 minutes before test and wait for the 'Start' button to be active. Start button will be active 3 minutes before the test. Students need upload their live photo after clicking the start button. Students can start the test when the countdown reaches the scheduled time. System will automatically take photographs of the students every 2 minutes and upload them to the monitoring page. If the teacher has set the proctoring optional, then students without cameras will be able to skip the 'upload photo' option, but students with camera enabled devices will need to go through the photo verification.
You can edit the test information and schedule of a test, from the 'Edit Test' option on the below page or from 'View Test' option in the Test creation interface. Do not change or schedule of the test while the test is in progress.
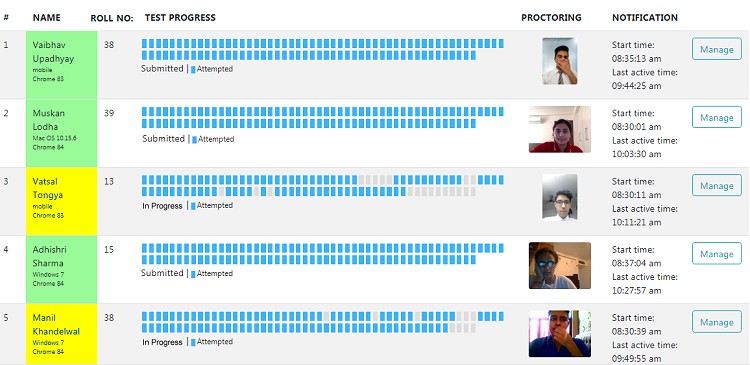
By clicking Manage from the above page, teachers can monitor and manage the test as shown below. On clicking the proctoring image, teachers can see all the series of photographs automatically taken by the system to check the student's actions and position.
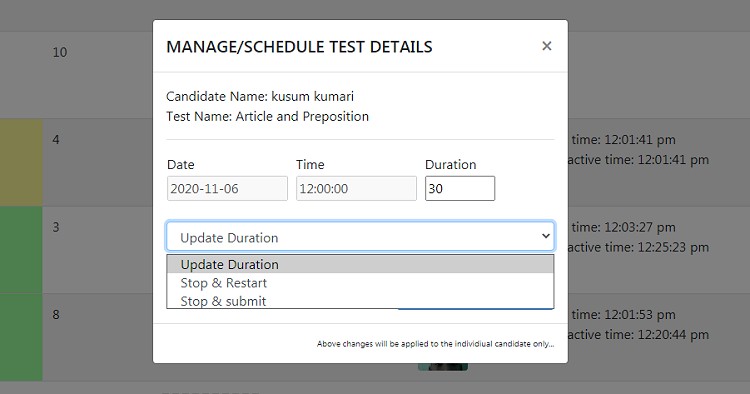
Form the 'Manage' link on the test tracker, you can restart a test, force submit a test or even extend the duration of the test. If you change the test duration while the test is in progress, it won't be applicable for the students who have already started a test. Such students can exit the test and resume the test to get the changed duration.
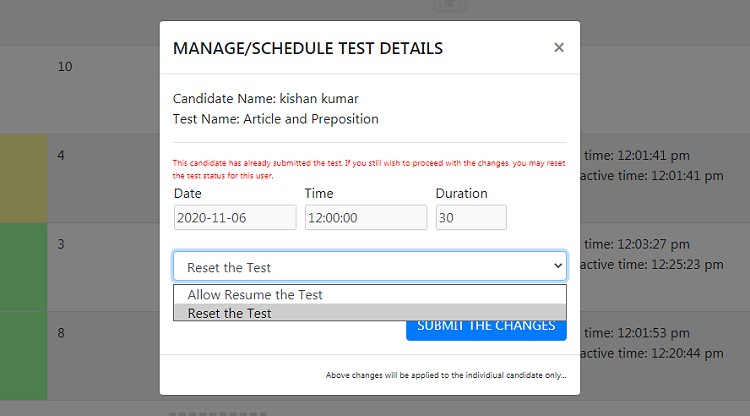
If a student's test got submitted by mistake or the test expired for the student, teacher can allow the student to 'Resume' or 'Restart' the test, from the 'manage' option on the below page within the test time. If you resume the test, the student can resume from where he has left the test. If you restart the test, student will have to attend all questions from the very start again.
If you want to reschedule a test which is already completed, you can change the date and time of the test and restart the test for the students who need to retake the exam. Students who have their test status as 'Submitted', won't be able take the test unless you restart the test for them.
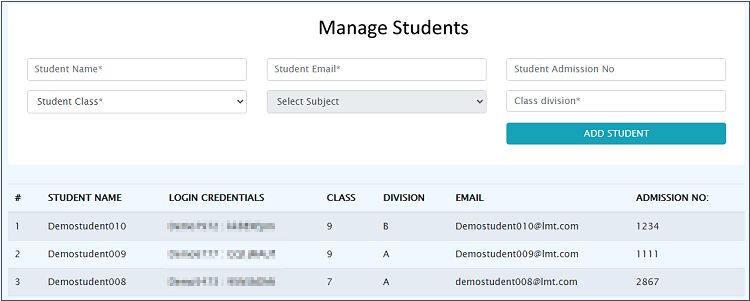
Teachers can add students to assign the tests to them from 'Manage Student List' link on the dashboard.
Teachers can add students if they are not already added at the school level. Teachers can view the login credentials of the students and communicate the same to students. Please ensure not to duplicate the student IDs as the reports won't come correctly if students have different login IDs to take the test.
EVALUATING ANSWERS :
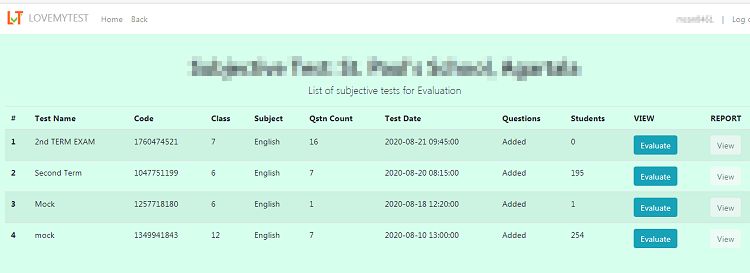
Teachers can evaluate the Subjective answers from the 'Evaluate Answers' option. Objective question papers are automatically evaluated.
Check the test details and click the 'Evaluate' button.
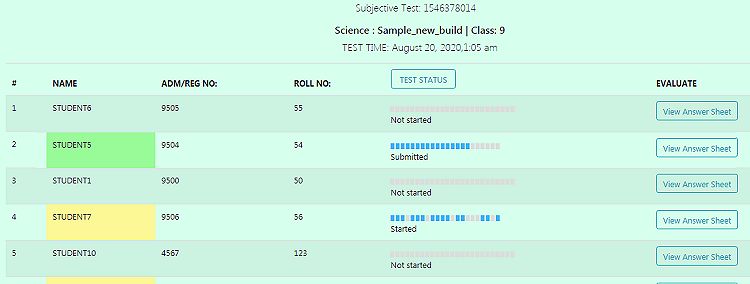
Check the student-wise submission details and click on 'View Answer Sheet' link.
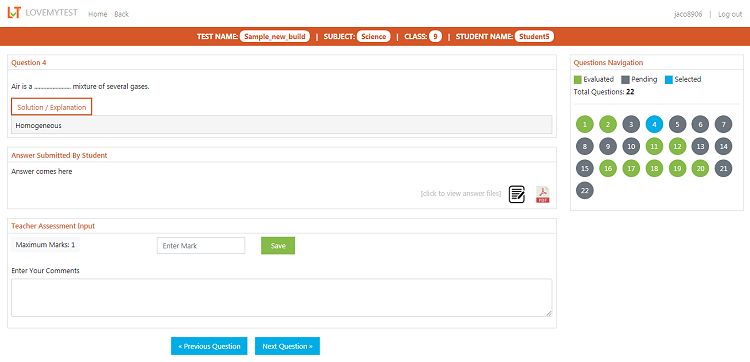
Navigate through the questions and answers one by one and give marks, add your comments and save the details for every answer. If there are image submissions, you can click on the image link in the answer to open the image, check the answer submitted by the student and give marks. When the evaluation is over for one student, you can go back to the previous page and evaluate another student.
PUBLISHING RESULTS:
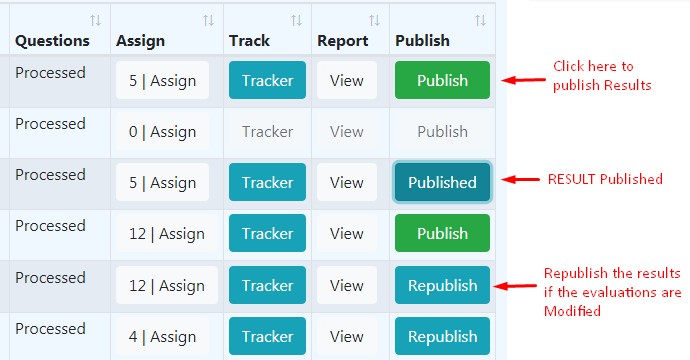
Teachers can now publish the results for subjective and objective tests so that students can see the results online.
Students will be able to view the marks, correct Solutions, teacher's feedback if any and annotations.
Teachers can now publish the results from the 'Conduct Online Tests' page.
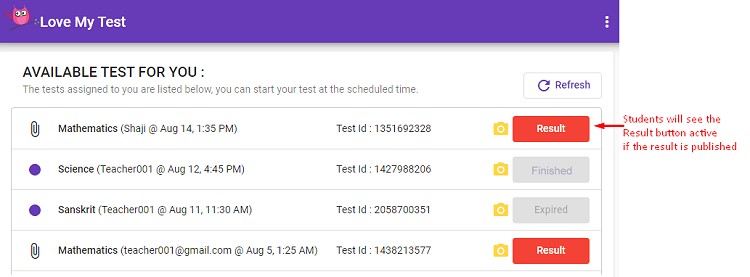
Students will have the 'Result' button activated on their login page.
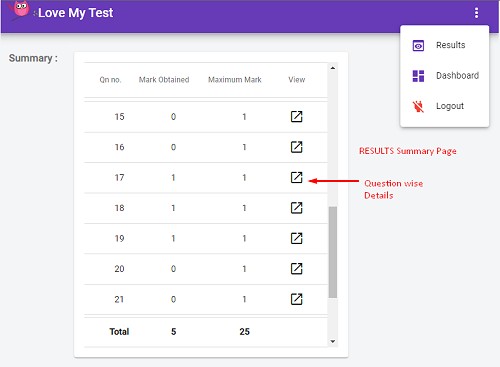
Students can see a summary score sheet as below.
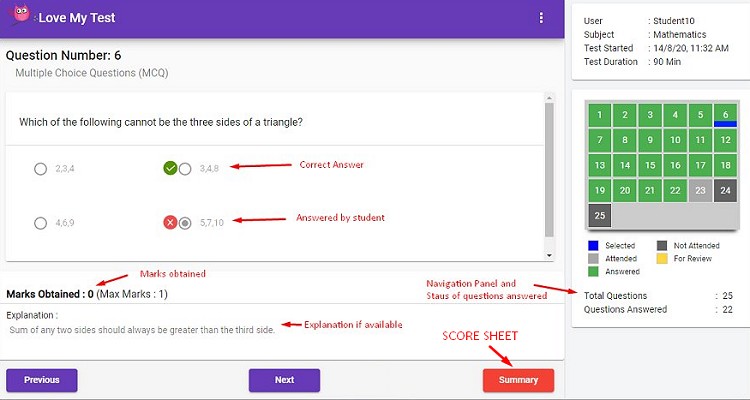
Individual questions, mark obtained and correct answers can be seen for objective questions.
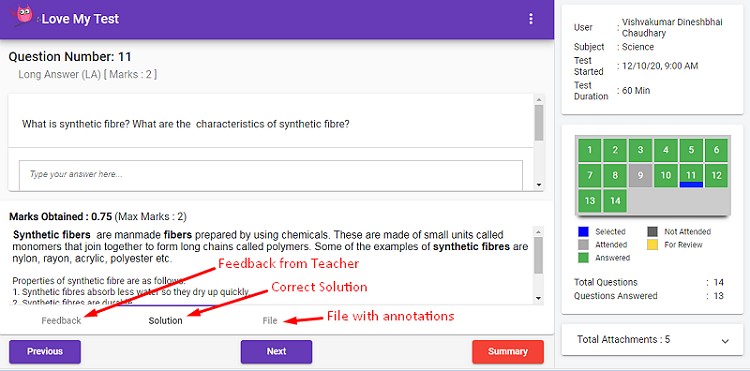
For subjective questions, students will be able to view the marks, correct solutions, teacher's feedback if any and annotations.
ADDING QUESTIONS:
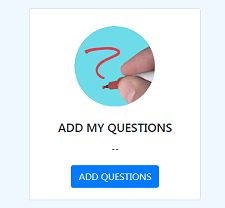
Teachers can add questions using 'Add My Questions' Page.
Select the class, book and chapter in which you need add the questions.
For the books where content is available in the system, chapters will be already added.
If chapters are not there, you can add a chapter and add questions.
While adding chapters, chapter numbers should be numeric.
For adding questions, select a chapter and click 'Add Questions' button.
Select the type of questions to be added and add the questions and answers in the given boxes.
Please follow the guidelines given below the page in each type of questions to understand the guidelines to be followed while adding questions.
Please do not give any numbering in the questions as the numbers will be automatically given by the system when a question paper is generated.
Please remove any blank spaces before and after the questions, else it will add extra spaces in the question paper.
In fill in the blanks, use 15-20 dots (.......................) instead of underlines. This is is to keep it consistent across questions. Else some will be with dots and some with underline, which will look odd in a question paper.
Keep the picture dimensions the smallest possible in the actual size it is required in a question paper. Do not add photographs taken in mobile cameras etc.. without editing and reducing to the smallest size, else they would show as very big images on the question paper. Keep the image sizes below 200x150pixel size, unless they are bigger tables,charts etc.
AVAILABLE QUESTION BANK:
NCERT book based question bank for class 6-12, Maths, Science, Social Sciences, English Literature, Computer Science, Physics, chemistry, Bio, Accountancy, Business studies, Economics, Entrepreneurship, Political Science, Informatics Practices and Statistics available for test creation.
NCERT question bank for 3-5 EVS is available, 3-5 Maths and English is in development and will be available soon.
Gujarat Board question bank for Social Studies, Computer science, Accountancy, Economics, Commerce and CC-SP available in the system.
For subjects where questions are not available, teachers can add their own questions and conduct exams.
New book names if any will be added by LMT team. Teachers need to add the chapters and questions in such books before generating question papers.
LANGUAGE KEYBOARDS:
In Windows10, regional languages are available without separate installation.
To activate a language, go to language settings preferences and add a language.
After adding the language, click the language > options and add a phonetic keyboard.
Now select the keyboard from the taskbar to use it while typing.
Lovemytest.com uses LaTeX equation editors to add equations. MS word equations won't work on webpages. You can practice creating LaTeX equations on the HOSTMATH link given below.
2. Select the menu for different type of equations and symbols
3. Take an equation type and change values inside the formula on right side, it will show the actual equation below.
4. You can also embed one formula within another to get more difficult formulas.
Adding EQUATIONS and FORMULAS in lovemytest: `
1. Once your equation is ready, you need to copy and paste the equation into the question entry text boxes. Eg: this text is copied from Hostmath \sqrt[3]{x^{2}+y^{3}}
2. You need to add the symbols $ before and after the equation when you copy paste it into the text box. This is how the browser is detecting where an equation is starting and ending ie: $ the equation $
3. Example: The equation $ \sqrt[3]{x^{2}+y^{3}} $ is displayed as 3 √ x 2 + y 3 x 2 + y 3 3
4. Above added page equation shows correctly in the review question page.
5. Once you learn the syntax of the equations, you can add them directly too without going to an equation editor like Hostmath. To start with use Hostmath. In case you are not able to find a type of equation or formula in Hostmath, you can check for the same in the codecogs link given above too. If you need further help with any equation, you may contact us.
Also check the HTML Symbols that can be used in text: Symbols
ADDING IMAGES:
Images should be added in JPG or PNG format and should be very small in size.
Images dimensions should be as small as possible just enough to view/read. Keep the width of images between 100 to 300 pixels with proportionate heights for all normal questions. Width can be slightly longer if the text is not readable.
Do not scan with mobilephones and upload directly. The images may become too large to be displayed on the question paper. Crop the images and reduce the size using the tools mentioned below.
You can find few simple tools which you can use to modify images.
MSPaint/Paint: Available in Windows/programs/accessories/Paint
Online Image Editor:
You can use the free online editor to modify/improve images: Freeonlinephotoeditor
Other Tools that you can download and install:
We have added some tools on google drive, which you can download and install them in your system to do screen capture and edit image. Other Tools
LightShot: A simple tool to copy paste images or text from a webpage, scanned book, PDF files etc.
PaintshopPro: A simple tool to edit images and save them a JPGs or PNGs. If you copy and image using Lightshot, you can paste them as a new image in paint shop with Ctrl+V or into an existing image with ctrl+E. You can then do simple enhancements, cropping, adding text etc. (You may use the installer or simply copy paste the software and run the psp.exe file)
Image specifications and improvements:
- Images should be cropped to take only the part which is relevant for the question. Remove the extra blank spaces, borders, page numbers etc.
- Images should be resized to smallest possible size (dimensions) where the text is readable and the required details are visible. See the images how it will look in 100% size that is how it will appear on the page. Ideally image width should not be more than 600pix and/or the height not more than 400 pix.
- Please think how an image would appear if the question is used on printed question paper too, hence make the images accordingly.
- Images used in MCQ options, should be same dimensions and very small (thumbnail size) to make them come in one line.
- Sharpen the image a bit after resizing to make the text if any clearly readable. You may also try other improvements available in the online tool.
- Do not upload photos taken using mobile/digital camera as it is. Edit them as mentioned above before uploading.
- If you are drawing on paper and adding a photo/or scanned image, please use white paper. Do not use paper with lines or colours. You can add drawing/sketches/geometrical figures or notes for answers like this. If the image comes dark, you can adjust the brightness / contrast to make the background white/brighter.
- Please ensure such drawings are done using geometry box with correct measurements than freehand.
FreeOCR: A simple tool to take out text from non searchable PDF files. Convert a PDF file to text. You can convert a full PDF file to text in one go or take out text page by page. Please note that it will be unformatted text without proper pagination.
Split or Merge PDF: A simple tool to split large PDF files to smaller ones or merge small PDFs.
Draw Chemical Structures:ACD/ChemSketch: Excellent free tool to create Chemical structures and diagrams. Download from the above link and install. Check this youtube video on basic usage: Video
Chemical structures created have to be added as images in the system, not as code.
Rupee Symbol: Rupee symbol is available by default in windos 10 systems and windows 7 with latest service packs. However if you are still not able see it, you can install the font patch.
Download and Install the rupee patch from the link: Rupee font patch
Change the settings to view the font: Windows settings for Rupee font
PLAGIARISM CHECKER:Free Online Plagiarism Checker
Setences with minimum five words required for the tool to test plagiarism.
Check that students are entering the correct login_Id and password.
Verify the login details from 'Manage Student List' and see if it is working.
Tests getting automatically submitted on login OR Wrong Date and Time shown on system: (This happens if the time zone of the device is wrong on student's system.)
Please ask the students to correct their time zone to India(UTC+5.30) and correct the time of their system.
If test got submitted, restart the test specifically for the student.
Camera not working:
Please ask students to install the latest version of Chrome and take the test in it.
If they are using an old phone, they should change the device.
In spite of all, if the camera is not working, let the student take the current test without camera and resolve the issue before the next test.
Test not visible to the student:
Check if the test is allocated to the student.
Images not coming in questions:
Internet may be disrupted. Ask the students to check their internet connection.
Students can login again and resume the test.
Formulas not showing in your questions:
Student's browser is not supporting formulas. Ask the student check their system from the login page and switch to a browser which displays formulas.
Front camera goes blank after answer photo is taken:
Student is using a browser or an old device which is not able to switch back to the front camera after a photo is taken. Ask to change their browser or phone and check.
Error on submit:
Internet may be disrupted. Ask the students to re-login again and submit the test.
If required, 'resume' the test for the student to re-enter and submit the test.
Ask the students to 'Check the System' compatibility from lovemytestonline.com login page.